The method described in this article may only be effective for Sony cameras.
Sending Signals to the Screen
Display measurement, or characterization, aims to establish a relationship between two spaces, for example, the pixel values in an image and the tristimulus values of the displayed light. For a camera, the difficulty lies in how to input a specific pixel value to be displayed on the camera’s screen, because the camera’s screen cannot directly accept a display signal, and we can’t easily determine if the internal system has colour management.
My first thought was to write an image to the memory card to see if the camera could be used as a kind of “image viewer”. In my test, if a Sony camera’s card contains an image not taken by the camera, it will report a “Cannot read memory card” error.
Following this, could we find a way to modify the contents of a camera-generated JPG file to make the camera think the picture was taken by itself, and thus display it? In practice, the method isn’t to modify the image data of the camera’s JPG file, but rather to extract the metadata from it, generate a solid colour image, and embed the metadata into it.
There are many ways to extract metadata. A well-known one is Pillow, which can extract ICC (which camera JPEGs don’t have) and EXIF, but that’s not enough. Sony’s JPEGs also have an XMP section that records two UUIDs. If you don’t copy this over, you’ll also get an error. The tool that can handle this part of the APP segment is Exiftool.
Use the following command to transfer the metadata, where pure_colour_image is the temporary image providing the content, which can be created by Pillow or similar tools. The thumbnail can be cleared or kept.
exiftool -tagsFromFile input_path -all:all -o output_path pure_colour_image
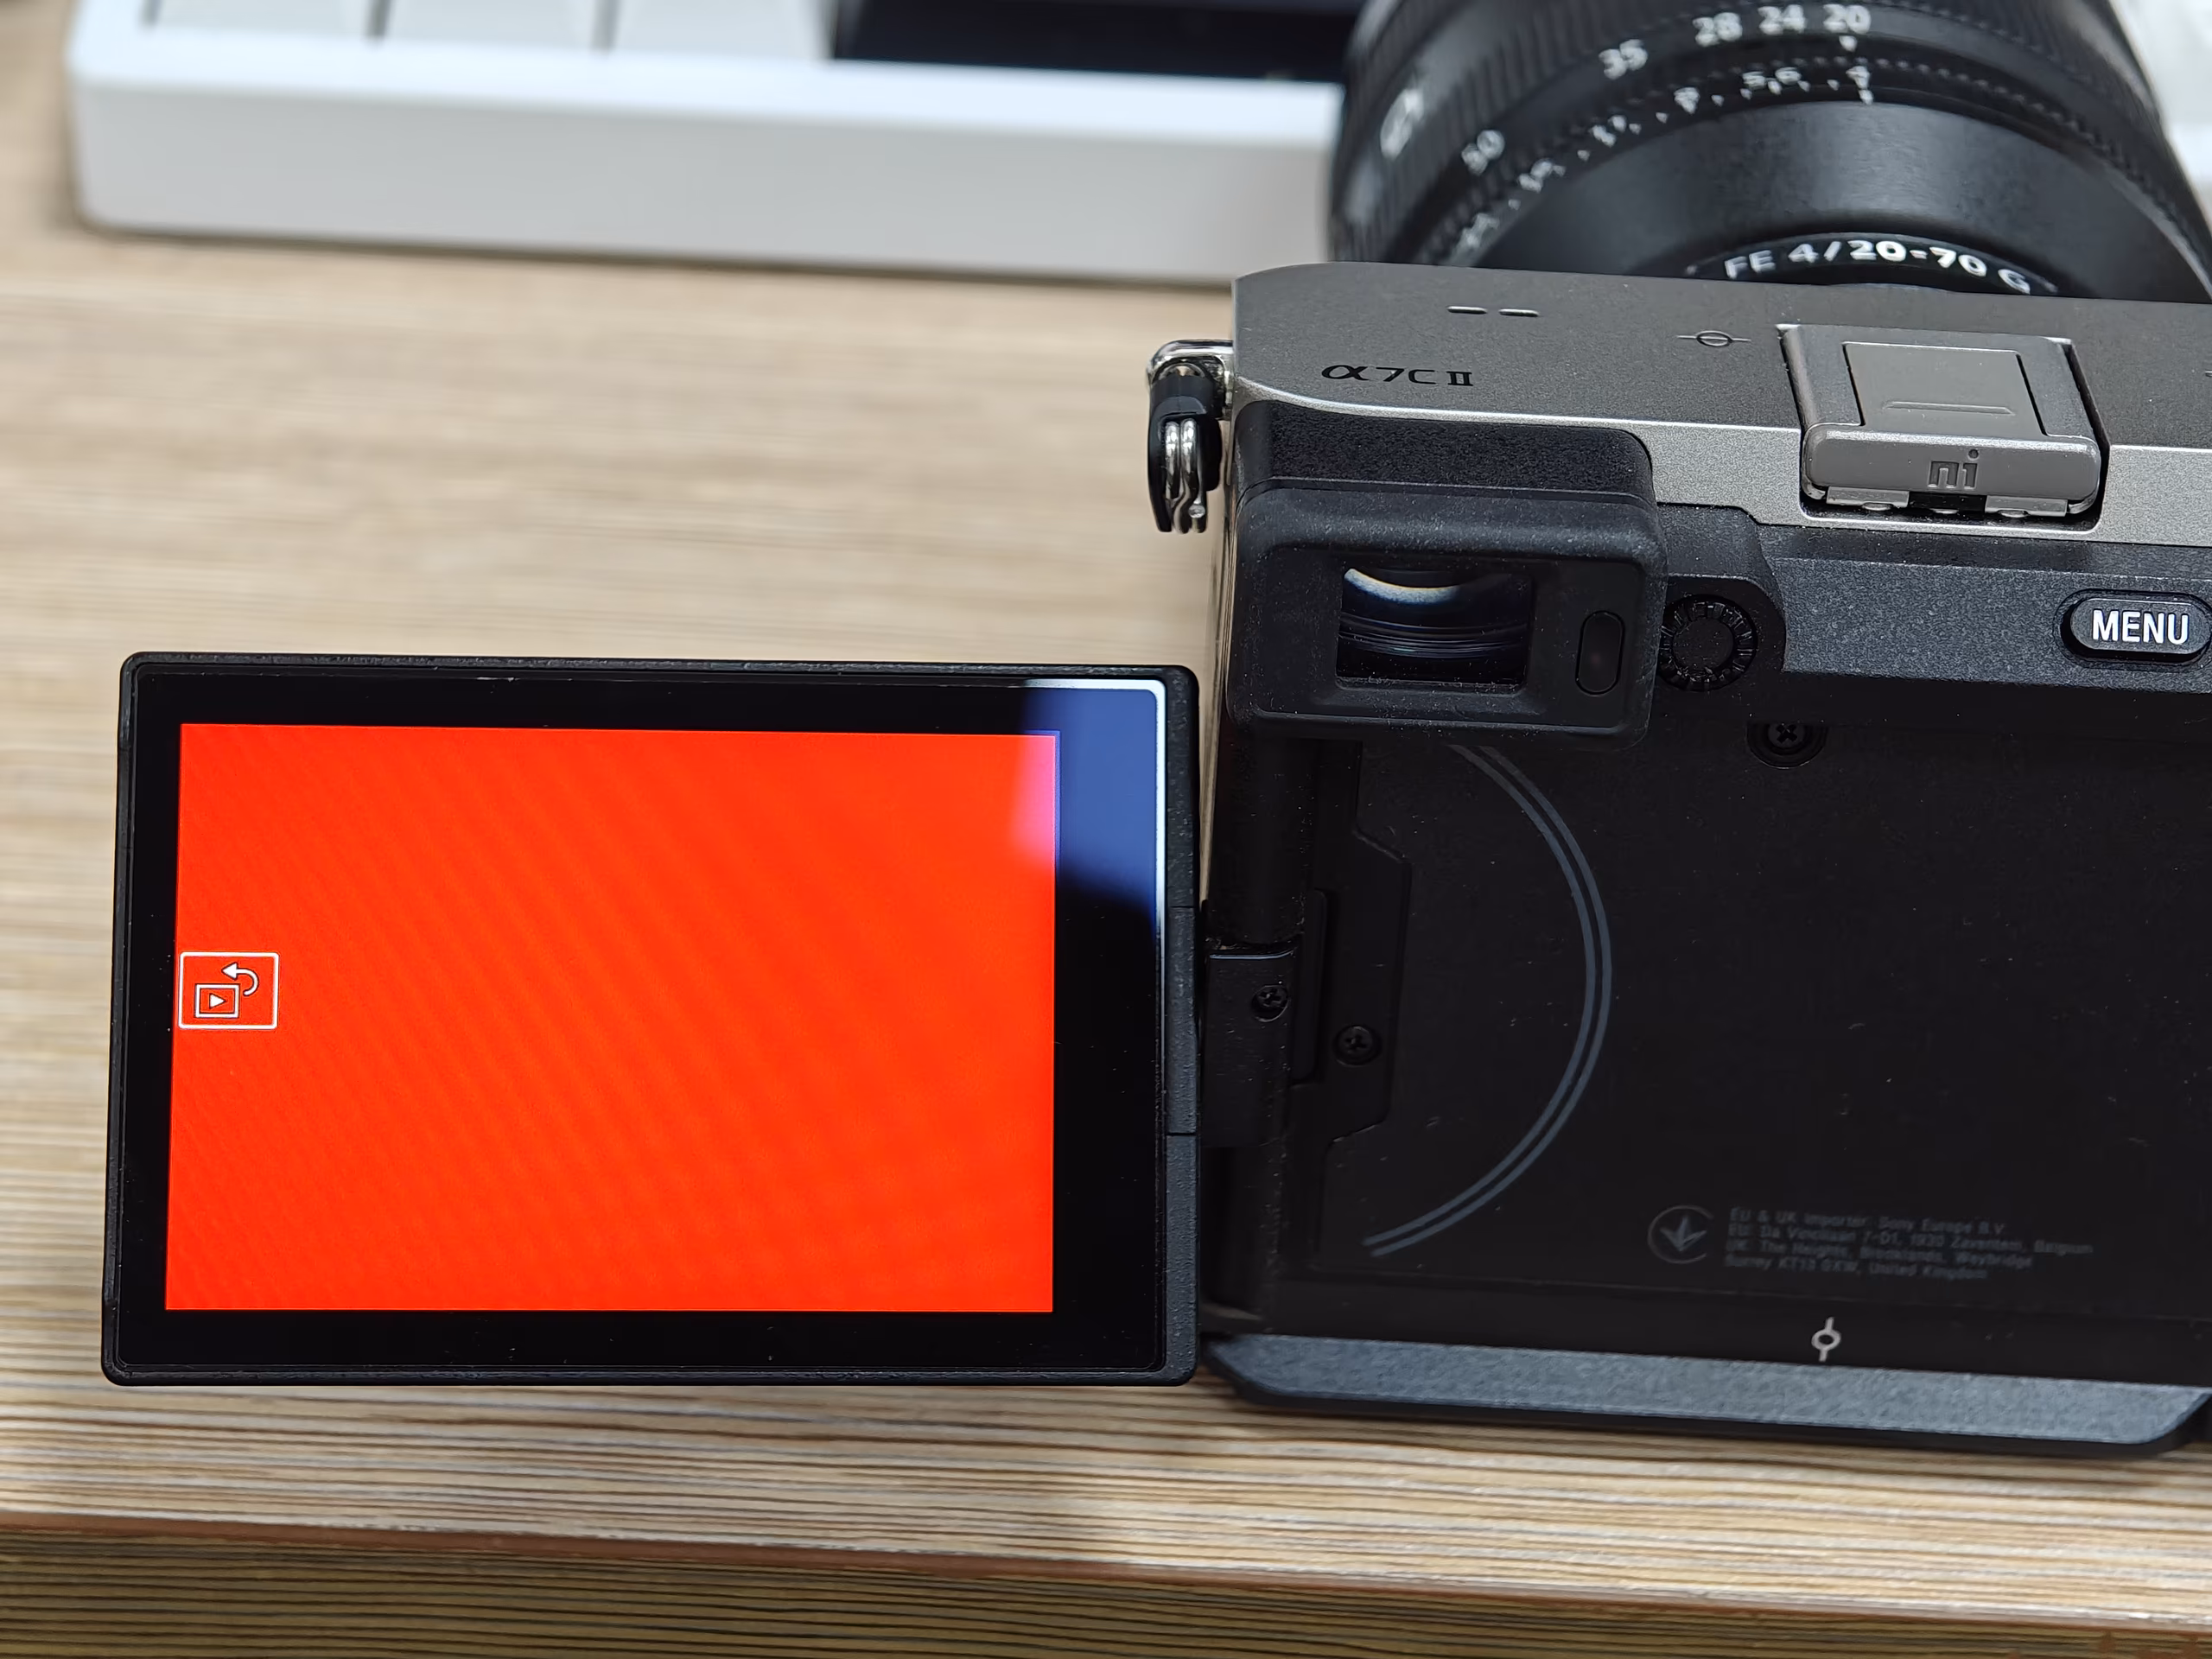
After writing a simple tool to transfer metadata to new solid colour images, I could display them on the camera’s screen.
A Simple Measurement Practice
Next, I used the same method to process 30 images for a simple hands-on test. The camera was set to the default manual brightness (a7c2’s normal/sunny mode and zve10mk2’s sunny mode show similar performance in colour).
The selected test patches included:
- Primary colours: Two on each R/G/B axis (120, 255), for a total of 6.
- Mixed primary colours: Yellow, cyan, magenta, 3 in total.
- Grayscale: 0–255 in steps of 15, for a total of 18.
- Reference colours: Light skin tone (241,149,108); a bluish-green (140,253,153); a purplish-blue (7,47,122), for a total of 3.
This was to evaluate gamut coverage, grayscale stability and transfer function, and colour accuracy.
Brightness and Contrast
The default manual luminance was 267.86 nits, with the black level at 0.15 nits, giving a contrast ratio of 1823:1.
After switching to ‘Sunny Weather’ mode, the luminance was 951.19 nits, with a black level of 0.54 nits, and a contrast ratio of 1771:1.
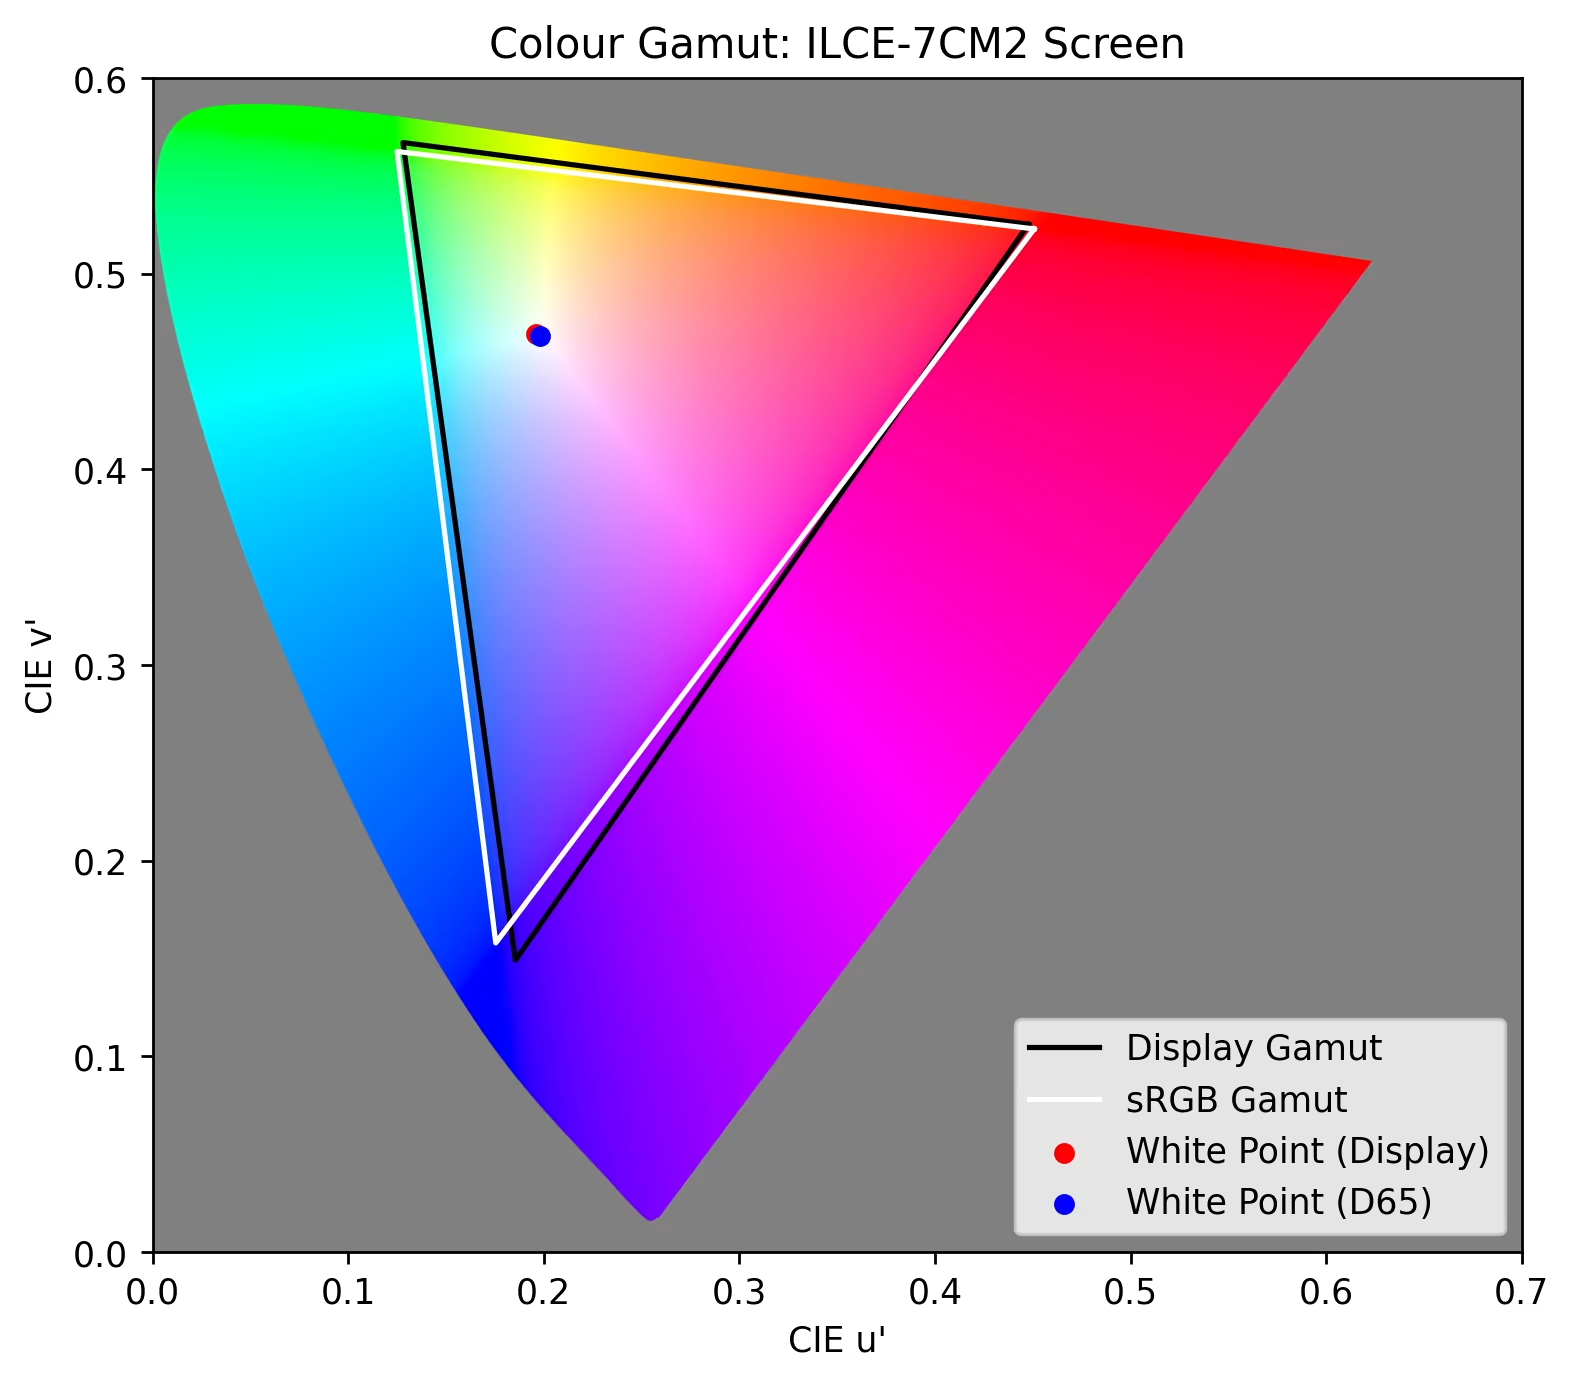
Gamut Coverage and Volume
Using the chromaticity coordinates of the three primary colours, we can calculate the gamut coverage and volume compared to sRGB:
Converting to CIE 1976 UCS (i.e., u’v’) and calculating the ratio of the triangular areas, the gamut coverage compared to sRGB is 95.90%, and the gamut volume is 101.14%.
Grayscale and Transfer Function
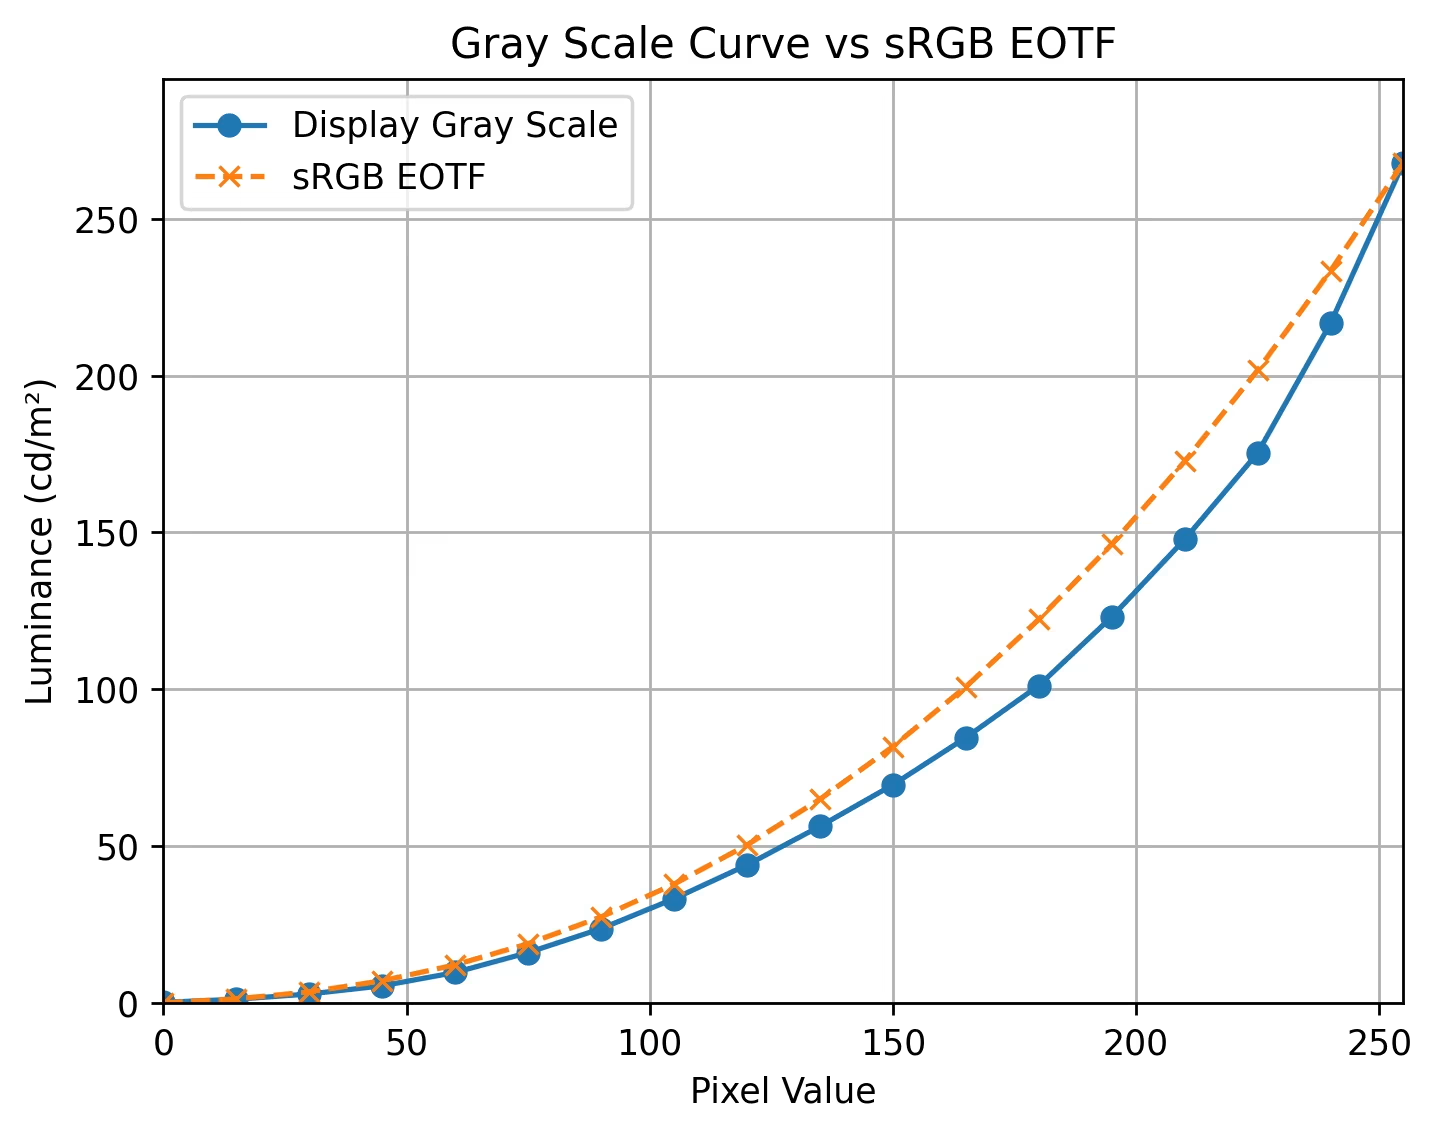
This shows the luminance values of the grayscale steps. After normalizing to the maximum luminance and comparing with the standard sRGB transfer function, this screen’s transfer function does not fit a Gamma curve well. If forced to fit, the gamma exponent would be close to 2.6.
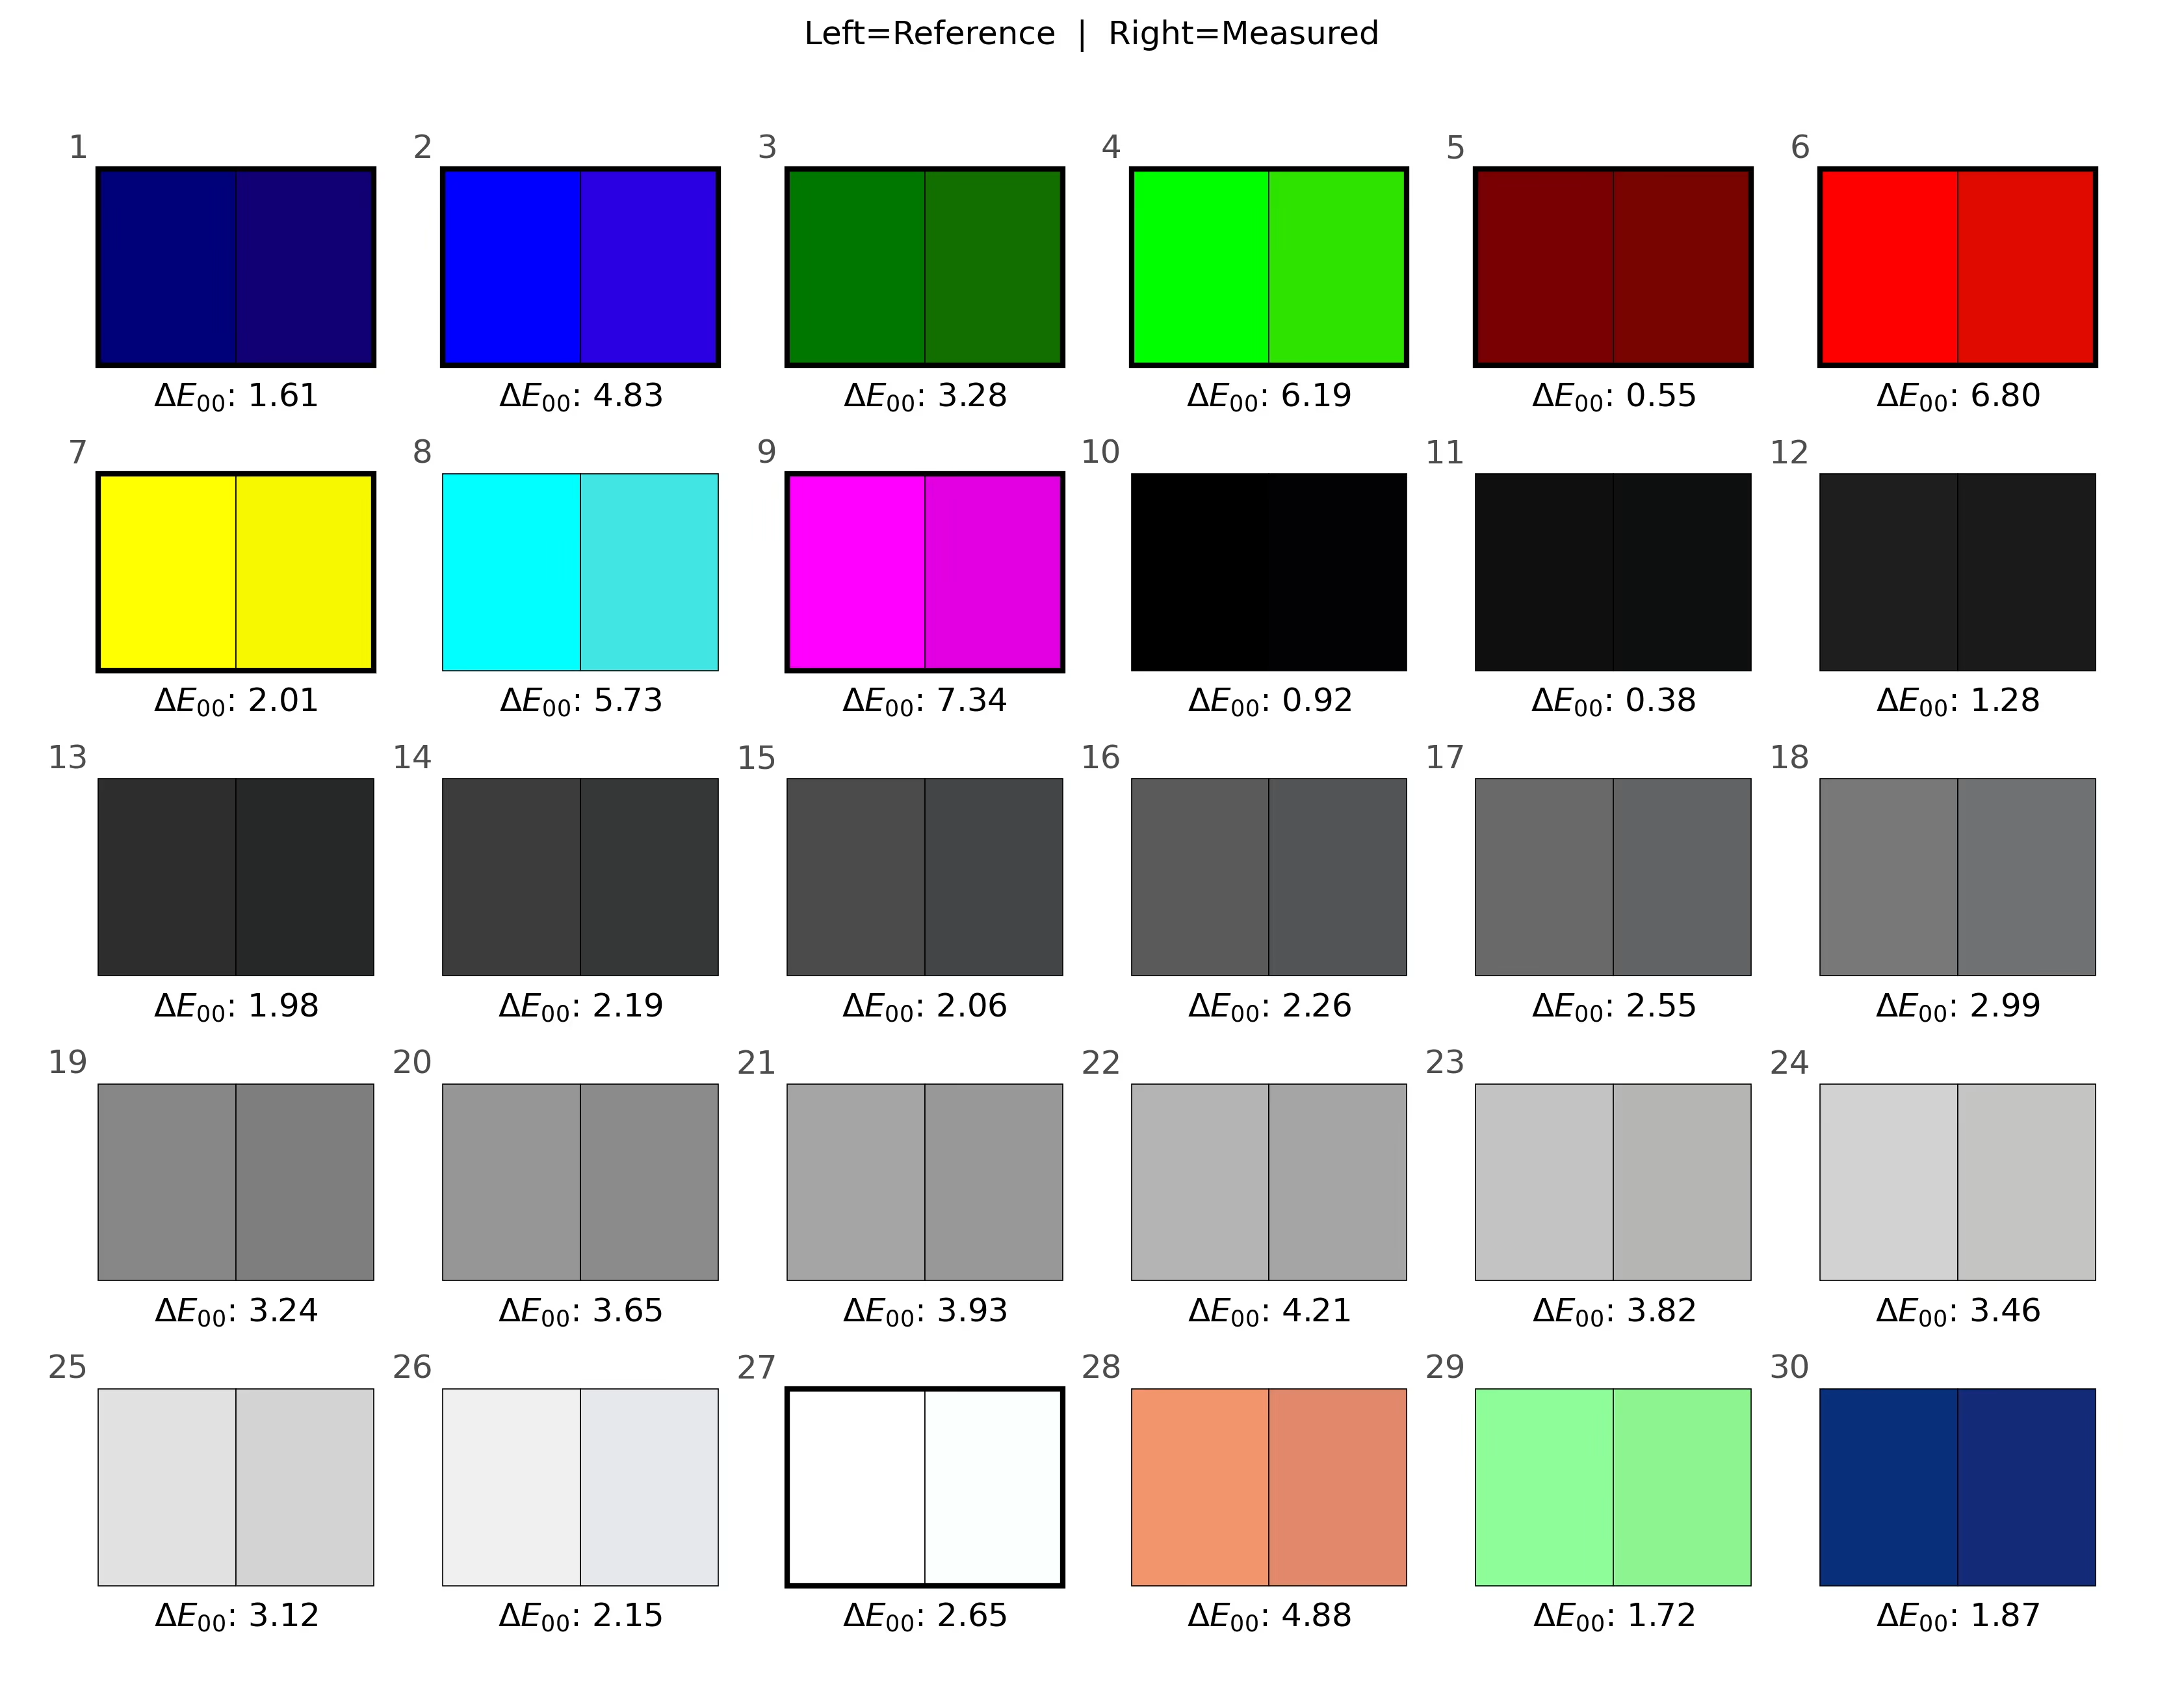
Colour Accuracy
Since the images we input were modified from the original sRGB JPGs, their theoretical values should correspond to the tristimulus values of the sRGB space. After normalizing by the absolute luminance of the displayed white, we calculated the colour difference for all 30 colours compared to the standard sRGB.
Calculating the colour difference using CIEDE 2000, the average deltaE is 3.12, and the maximum deltaE is 7.34 (for magenta).
About Adobe RGB
Most cameras allow setting the ‘Colour Space’ in-camera, usually offering sRGB and Adobe RGB options. This option only affects JPG files. Generally, an ICC profile is used to identify the colour space, but Sony cameras use a different method, relying on EXIF tags.
- Interoperability Index: R03 - DCF option file (Adobe RGB)
- Interoperability Version: 0100
Adobe’s Gain Map Demo can recognize this tag and identify the image as being in the Adobe RGB space.
However, Exiftool’s default behavior does not transfer these two tags; you need to add the -unsafe parameter.
Conclusion
This Sony in-camera screen, while not excellent, isn’t terrible either. Its only drawback is perhaps the overly high gamma value of the transfer function (if you can call it ‘gamma’). The peak luminance of nearly 1000 nits isn’t low either. The poor viewing experience is more attributable to the small size, low resolution, and poor viewing angles.
As a preview screen, making the gamut larger and showing a more vibrant, higher-contrast image, combined with a larger display area, high resolution, and good viewing angles, can significantly improve the actual shooting experience. In fact, the screen on the Hasselblad X2D is optimized to some extent in this way, and it’s one of the best-looking camera screens I’ve ever seen (where ‘best’ here means it looks good rather than accurate).
I don’t think anyone would seriously judge a photo’s quality on in-camera screen. I’d prefer a camera that looks better, giving the user a more pleasing image during shooting. As for the large difference between the internal screen and computer displays, this can be addressed in the companion software by providing a preset that adjusts the image to match the look of the in-camera screen. This is not difficult to achieve in colour management systems similar to ICC.