Two JPEGs
Most modern mobile phones now support Gainmap photos. The ProXDR photos often mentioned by OPPO are, in fact, Gainmaps. Previously, it was a proprietary format, but they later adopted Google’s UltraHDR.
If you search for the JPEG start marker FF D8 and end marker FF D9 in binary mode, you’ll find that this type of image file contains more than one JPEG image. Typically, right after the first end marker, you’ll find the start marker for the next one. If you separate them directly from the byte stream and save them as two separate JPEG files, you can see the base image and the gainmap. Additionally, within the APPn marker segment of the gainmap, you can find the metadata needed to decode it in XMP format, such as Min, Max, Gamma, and Offset.
Interestingly, the straight-out-of-camera JPEGs from Sigma’s latest camera, the Sigma BF, also use this format, making it the first camera to produce HDR JPEGs directly. It’s a pleasant surprise to see this format in the traditional camera industry.
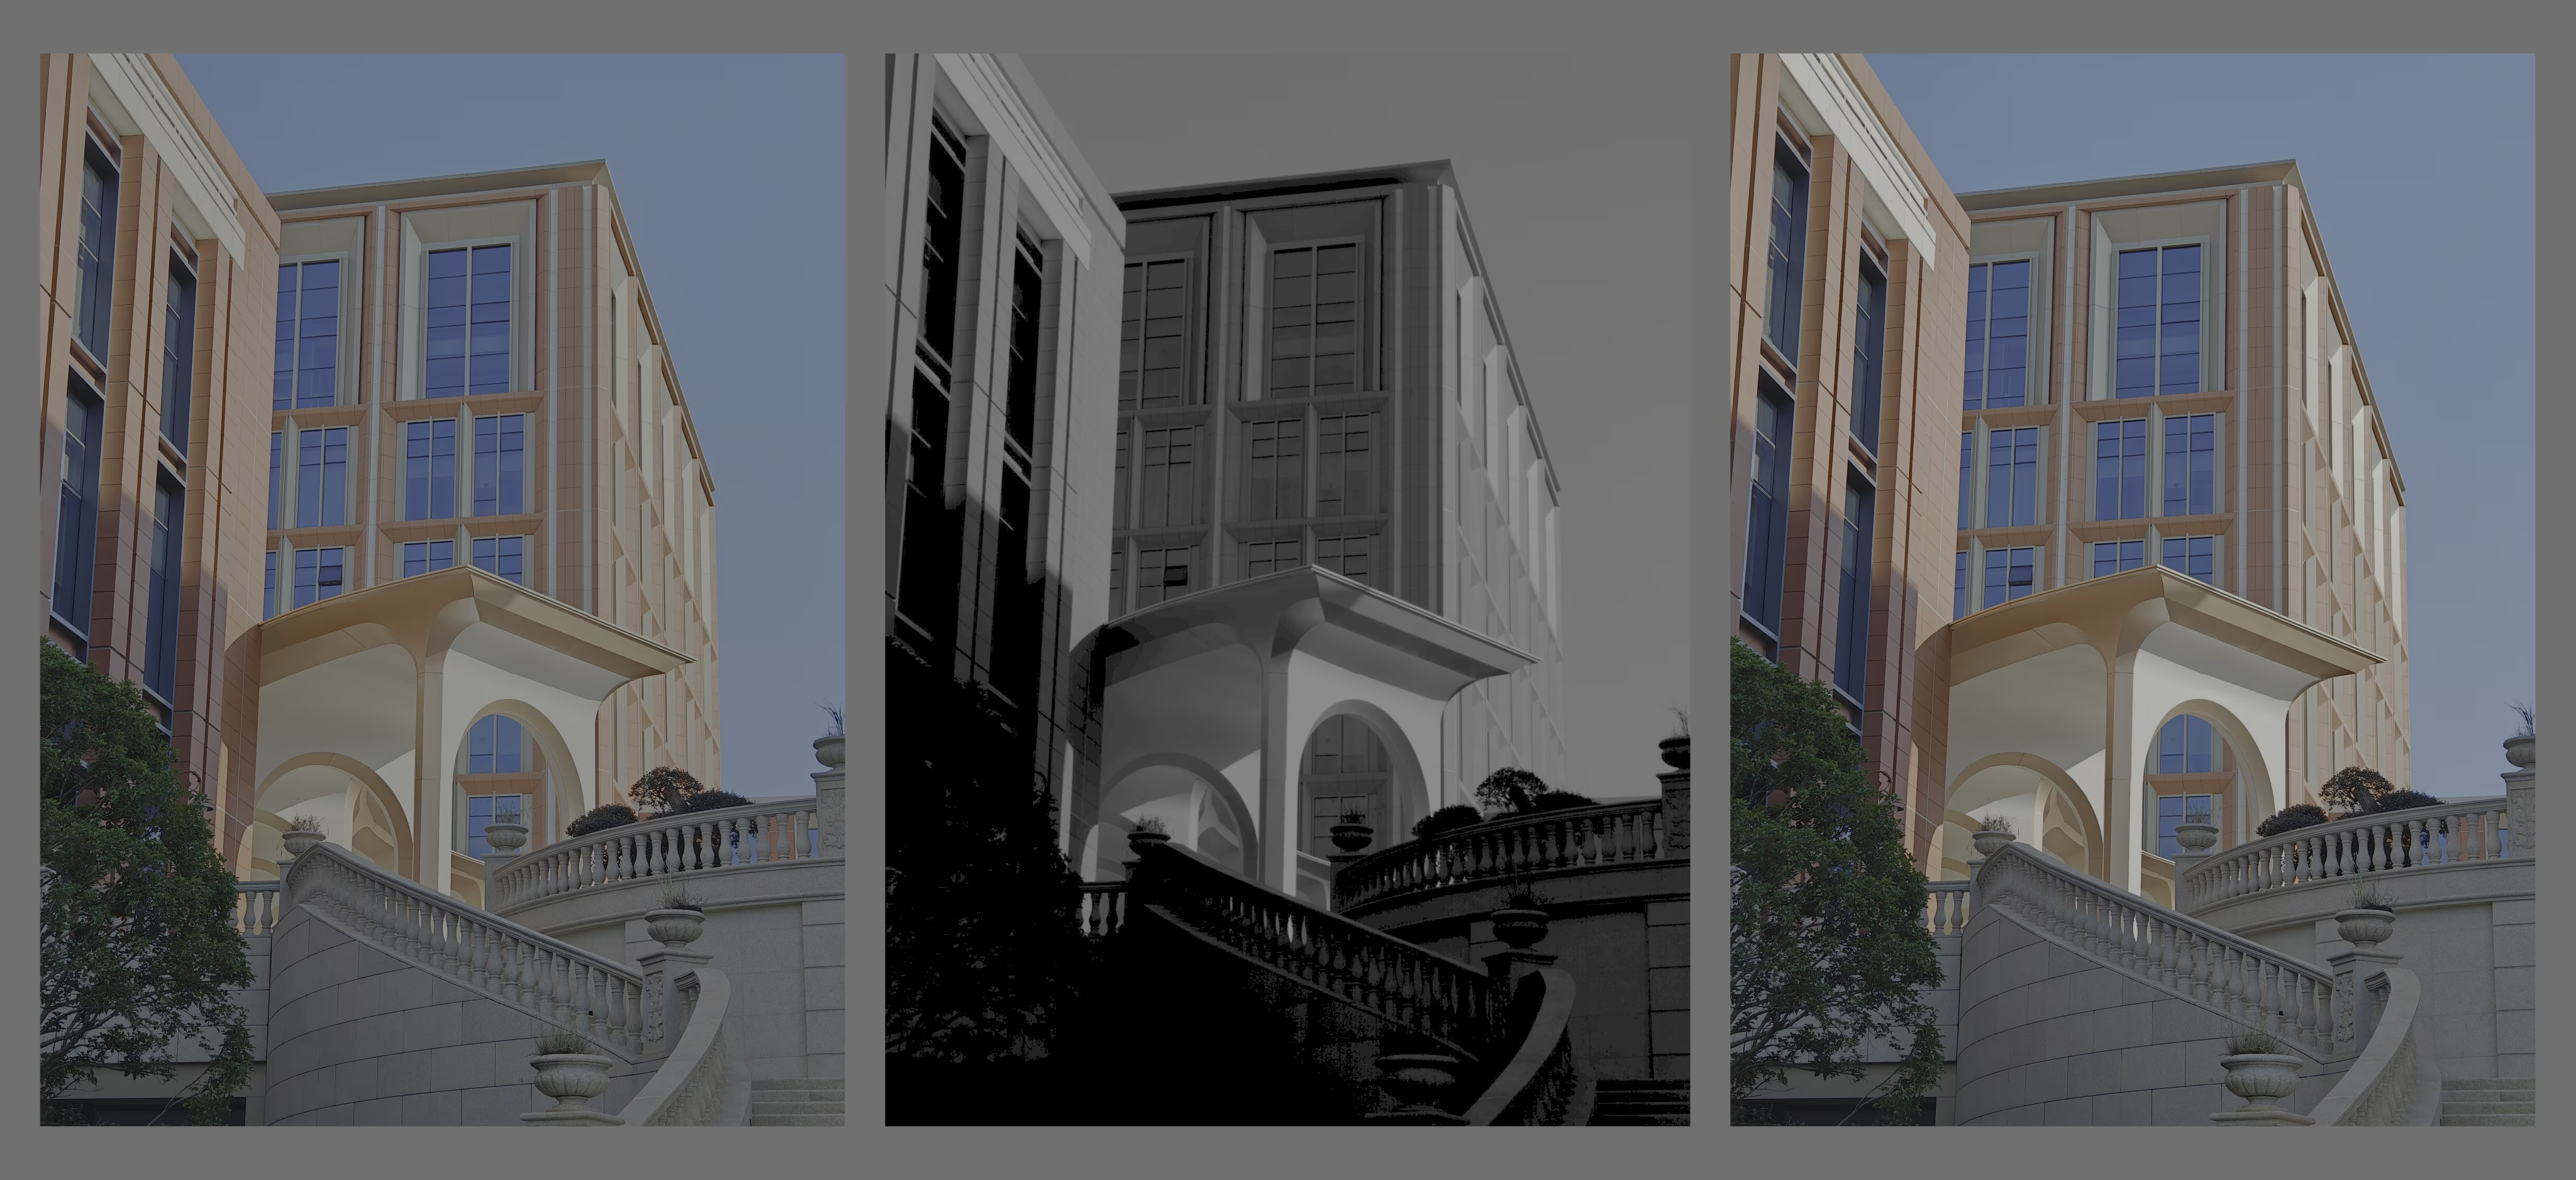
This is a JPG photo taken with an OPPO Find X6 Pro that complies with the UltraHDR standard. The building at Huawei’s LianQiu Lake campus was illuminated by sunlight from one side, creating a large contrast between light and shadow. On the left is the first JPG segment, which is the primary image in UltraHDR—a standard SDR image. This is what you see on viewers that don’t support UltraHDR or on non-HDR displays. In the middle is the second JPG segment, the Gainmap. As it’s not designed to be viewed directly, it’s just rendered here in RGB as a way to ‘visualise’ it.
{
  "Version": 1.0,
  "GainMapMin": 0,
  "GainMapMax": 2.16048,
  "Gamma": 1,
  "OffsetSDR": 0,
  "OffsetHDR": 0,
  "HDRCapacityMin": 0,
  "HDRCapacityMax": 2.16048,
  "BaseRenditionIsHDR": false,
  "OplusScale": 4.47065
}
This is the metadata extracted from the APP1 segment of the second JPG. The pixel values in the gainmap need to be calculated into a ‘multiplier’ based on this metadata to produce the HDR effect on the right. OplusScale is a proprietary field from OPPO; its exact purpose is unclear. The rest are standard elements of UltraHDR.
On the right is the composited HDR result. For demonstration purposes, this image is actually a pure HDR AVIF image, decoded and then re-encoded using PQ; it is not an UltraHDR file. If the peak luminance of the display allows, the visual effect is identical; otherwise, it may look different. Below is the original version in UltraHDR format. The file size is relatively large, so it might load a bit slowly.
Recording the Difference
A Gainmap records the difference between SDR and HDR. This can be understood from many perspectives.
Imagine you have an image, and on an HDR device, you want certain areas of the picture to be brighter than the standard SDR white point, creating a highlight effect. Without altering the SDR display effect, you can use another image to mark the areas that need to be brightened and by how much, and then encode the SDR image and the difference map together.
Alternatively, say you have an HDR image, but its format has poor compatibility, and relying on devices to tone map it down to SDR also yields unsatisfactory results. You could first tone map it down to a pleasing SDR image, encode it into a traditional, mature format, and then use another image to record the difference between the original HDR and the SDR version, and encode them together.
In short, a Gainmap itself only records the difference. You could, for instance, take an image with actual content, treat it as a gainmap, and package it with a solid-colour base image. This would create something where the picture is only visible on a device that can successfully decode it for HDR display.
The two examples above both use an SDR base image. In reality, the base image can also be in HDR, with the Gainmap recording how to tone map it down to SDR. However, in most cases, an SDR base image is used because even if the decoder doesn’t support it, the file can still be displayed as a regular SDR image, offering the best compatibility.
Therefore, a Gainmap is simply an encoding method to be used after you have both an HDR and an SDR image. It shouldn’t be seen as a method for adjusting the image itself. For example, performing some operation on the Gainmap to make the image brighter, or generating a Gainmap with some algorithm without an existing HDR image to up-convert an SDR image to HDR.
Calculating the Gainmap
Regarding how to generate a Gainmap, I believe readers should refer to the documentation for specific platforms, especially for a new technology like Gainmaps with many competing standards. This article focuses more on introducing the concept.
A few recommended documents and web pages:
- Google’s UltraHDR. This is currently the most widely used dual-layer HDR format. Version 1.1 is also compatible with the ISO 21496-1 international standard. If you’re an Android developer, it’s a must-read.
- Adobe’s gainmap. Adobe is also a major proponent of this format. The demo app they released is the most convenient way to view various HDR images. That page also has a detailed spec document containing some very valuable notes.
Before generating a Gainmap, you need to prepare your SDR and HDR images in a linear light space. For instance, you might define the SDR image’s pixel value range from 0 to 1, with the HDR image aligned to the same scale but allowing for negative numbers or values greater than 1. This is because both SDR and HDR need to share the same colour primaries (e.g., P3). If a smaller set of primaries is chosen (like sRGB), or if the HDR image has a very wide colour gamut, negative values can occur. Don’t worry, Gainmaps can record negative values. Values over 1 are a characteristic of HDR itself.
$$ G = \log_2 \frac{\text{HDR}+k_{\text{hdr}}}{\text{SDR}+k_{\text{sdr}}} $$Here, the two k values are offsets used to shift potential negative values into the positive range, ensuring the logarithm operation is valid.
Next, find the maximum and minimum values of G, which are used to map G into the 0-1 range. For better reliability, you can choose to exclude a small percentage of the lowest and highest values before selecting the min and max, and then clip any values outside the 0-1 range.
This gives you an image in the 0-1 range. You can apply a gamma curve to it to improve quantisation efficiency and choose a suitable bit depth (usually 8-bit) and encoding method to encode it.
At the same time, you must also encode the offsets, maximum and minimum values, gamma, and other metadata together according to the specification.
Single-Channel vs. Three-Channel
To save space, a Gainmap can be greyscale, which is what most Android phones currently use. The “True Colour ProXDR” photos on the OPPO X8 Ultra, for instance, refer to an upgrade to three channels.
The main difference between a greyscale Gainmap and a three-channel colour Gainmap lies in the correlation or degree of freedom between the SDR and HDR versions.
A three-channel Gainmap offers almost complete freedom. The HDR and SDR versions can be unrelated, as the Gainmap can establish a link between any two arbitrary points. A single-channel Gainmap, however, requires the RGB pixel values in the SDR and HDR images to have the same ratio, or in other words, to lie on the same line from the origin in a spatial coordinate system.
Without constraints on the SDR image, both types of gainmaps can achieve the same HDR colour gamut volume. However, the three-channel version allows for more flexible tone mapping methods, whereas a single-channel gainmap can only perform tone mapping in terms of luminance. When keeping the SDR image the same, a three-channel Gainmap can control the HDR image with more finesse.
What’s the impact? According to the Bezold–Brücke and Hunt effects, as brightness changes, the hue and saturation of colours also change. A single-channel gainmap can only control luminance. If you preserve the HDR appearance, the tone mapping down to SDR is restricted. If you preserve the SDR appearance, the HDR content you can store is limited, as their hues (referring to the RGB space, not perceptual hue) cannot differ.
Furthermore, in terms of quantisation precision, a three-channel Gainmap also has certain advantages. By recording the individual maximum and minimum values for each of the three channels in the metadata, it allows control over the compression level and gamma for each channel during normalisation.
Compressing the Gainmap
When compressing a Gainmap, especially with downscaling operations (most phones downscale to 50% of the original width and height), misalignment with the base image can occur, causing the composite HDR image to exhibit false colour artefacts and banding. Similarly, compressing the base image can also lead to misalignment with the Gainmap, particularly in high-frequency areas, which becomes more apparent in typical HDR scenes like point light sources.
The methods for compressing a gainmap are largely the same as for a regular image, such as JPG, JPEG XL, and HEIC. However, gainmaps are not quite the same as regular images, so some have proposed specialised methods. The simplest involves applying an additional gamma function to the gainmap. There are also methods that use machine learning, like this paper that uses an MLP to compress gainmaps.
T. D. Canham, S. Tedla, M. J. Murdoch, and M. S. Brown, “Gain-MLP: Improving HDR gainmap Encoding via a Lightweight MLP,” Mar. 14, 2025, arXiv:2503.11883.
Other Packaging Methods
JPEG XL is the latest JPEG format, which boasts a very high compression ratio and supports many new features, including dual-layer formats.
HEIF and AVIF also support dual-layer formats, storing the gainmap as an auxiliary image in the metadata. For example, HDR photos taken with an iPhone are saved in this manner. During decoding, you first need to find the corresponding tag to extract the Gainmap. Photos taken on OPPO phones with ‘High Efficiency’ storage enabled are also stored as HEIF, but the tags are different.
TIFF can also save multiple frames together, so it can also store gainmaps.
When exporting an HDR image from Adobe Camera Raw or Lightroom, if you select ‘Maximum Compatibility’, the exported file will be in one of the formats mentioned above.
Summary and Future
The Gainmap has been widely adopted. It’s forward-compatible, widely supported by various new container formats, and conveniently stores the result of tone mapping.
From an HDR perspective, however, it’s based on relative luminance, just like SDR, but it’s also constrained by the peak brightness of the HDR display. When a user adjusts the screen brightness, the displayed result may change significantly. If a display’s HDR capability is less than the maximum specified in the gainmap, the practical implementation of tone mapping for these intermediate cases is somewhat ambiguous.
Additionally, storing a gainmap requires two 8-bit images, which might be less compression-efficient than a single 10 or 12-bit pure HDR image. Most cloud services that process JPEGs (like image compression on CDNs or moderation on social media) might also miss the gainmap because it’s located after the end of the first JPG stream.
In the next post, I’ll write about the characteristics and usage of common Gainmap formats, and I’ll also organise and provide some Python code.